Hexo 功能强大、主题丰富,非常适合打造成一个学习经验笔记的个人展馆。结合 Docker 和 Nginx,我们可以进一步将 Hexo 作为项目学习、验证与部署的统一入口。
一、云服务器的选择与使用
综合考虑性价比后,我最终选择了火山引擎的超小型服务器。系统采用 Ubuntu 24.04,需要在防火墙中开放 80 和 443 端口(HTTP 对应 80,HTTPS 对应 443)。
二、服务器初始化和安装软件
1. SSH 登录服务器
1
2
3
4
5
6
7
| ssh root@101.126.131.181
|
2. 创建普通用户(安全最佳实践)
1
2
3
4
| adduser deploy
usermod -aG sudo deploy
exit
ssh deploy@101.126.131.181
|
3. 基础安全加固
1
2
3
4
5
6
| sudo apt update && sudo apt upgrade -y
sudo ufw allow OpenSSH
sudo apt install nginx git -y
sudo ufw allow 'Nginx Full'
sudo ufw enable
|
三、Hexo的安装与配置
第一阶段:Hexo 基础环境与主题安装
首先,我们需要搭建一个基础的博客骨架。
1. 初始化 Hexo
在本地开发机上:
1
2
3
4
5
6
7
8
9
10
11
12
13
|
npm install -g hexo-cli
hexo init my-tech-portal
cd my-tech-portal
npm install
npm install hexo-renderer-pug hexo-renderer-stylus --save
npm install hexo-asset-img --save
|
2. 安装 Theme Butterfly
1
| npm install hexo-theme-butterfly --save
|
3. 启用主题
修改根目录下的 _config.yml:
1
2
3
4
5
6
7
8
9
10
11
12
13
|
language: zh-CN
theme: butterfly
post_asset_folder: true
theme_config:
extends:
|
第二阶段:内容架构改造(实现“双入口”)
我们需要将网站分为两个核心部分:“技术博客” 和 “项目实验室”。
1. 创建“项目实验室”页面
这是本方案的核心。我们不使用普通的文章页,而是创建一个独立的展示页。
执行命令:
2. 编写项目展示页代码 (source/projects/index.md)
我们将在这个文件中直接嵌入 HTML 和 CSS,打造一个类似 Apple App Store 或 Google Play 的卡片式入口。
请将 source/projects/index.md 的内容完全替换为以下代码:
1
2
3
4
5
6
7
8
9
10
11
12
13
14
15
16
17
18
19
20
21
22
23
24
25
26
27
28
29
30
31
32
33
34
35
36
37
38
39
40
41
42
43
44
45
46
47
48
49
50
51
52
53
54
55
56
57
58
59
60
61
62
63
64
65
66
67
68
69
70
71
72
73
74
75
76
77
78
79
80
81
82
83
84
85
86
87
88
89
90
91
92
93
94
95
96
97
98
99
100
101
102
103
104
105
106
107
108
109
110
111
112
113
114
115
116
117
118
119
120
121
122
123
124
125
126
127
128
129
130
131
132
133
134
135
136
137
138
139
140
141
142
143
144
145
146
147
148
149
150
151
152
| ---
title: 项目实验室
date: 2023-10-27 12:00:00
type: "projects"
layout: page
comments: false
---
<style>
.project-container {
display: grid;
grid-template-columns: repeat(auto-fit, minmax(300px, 1fr));
gap: 2rem;
padding: 2rem 0;
}
.project-card {
background: rgba(255, 255, 255, 0.05);
backdrop-filter: blur(10px);
border: 1px solid rgba(0, 0, 0, 0.1);
border-radius: 20px;
padding: 25px;
transition: all 0.3s cubic-bezier(0.25, 0.8, 0.25, 1);
box-shadow: 0 4px 6px rgba(0, 0, 0, 0.02);
display: flex;
flex-direction: column;
justify-content: space-between;
position: relative;
overflow: hidden;
}
[data-theme="dark"] .project-card {
background: rgba(0, 0, 0, 0.2);
border: 1px solid rgba(255, 255, 255, 0.1);
}
.project-card:hover {
transform: translateY(-5px);
box-shadow: 0 12px 24px rgba(0, 0, 0, 0.1);
border-color: #007AFF;
}
.project-status {
position: absolute;
top: 15px;
right: 15px;
font-size: 0.75rem;
padding: 4px 10px;
border-radius: 12px;
font-weight: 600;
letter-spacing: 0.5px;
}
.status-live { background: rgba(52, 199, 89, 0.2); color: #34C759; }
.status-dev { background: rgba(255, 149, 0, 0.2); color: #FF9500; }
.project-icon {
width: 50px;
height: 50px;
background: #000;
color: #fff;
border-radius: 14px;
display: flex;
align-items: center;
justify-content: center;
font-size: 24px;
margin-bottom: 15px;
}
[data-theme="dark"] .project-icon { background: #fff; color: #000; }
.project-title {
font-size: 1.4rem;
font-weight: 700;
margin-bottom: 10px;
color: var(--font-color);
}
.project-desc {
font-size: 0.95rem;
color: var(--text-highlight-color);
line-height: 1.6;
margin-bottom: 20px;
opacity: 0.8;
}
.tech-stack {
display: flex;
gap: 8px;
flex-wrap: wrap;
margin-bottom: 20px;
}
.tech-tag {
font-size: 0.75rem;
padding: 3px 8px;
border-radius: 6px;
background: rgba(0,0,0,0.05);
color: var(--font-color);
border: 1px solid rgba(0,0,0,0.05);
}
[data-theme="dark"] .tech-tag { background: rgba(255,255,255,0.1); border-color: rgba(255,255,255,0.1); }
.project-link {
display: inline-flex;
align-items: center;
justify-content: center;
width: 100%;
padding: 12px 0;
background: #000;
color: #fff !important;
border-radius: 12px;
font-weight: 600;
text-decoration: none !important;
transition: opacity 0.2s;
}
[data-theme="dark"] .project-link { background: #fff; color: #000 !important; }
.project-link:hover { opacity: 0.8; }
</style>
<div class="project-container">
<div class="project-card">
<div class="project-status status-live">运行中</div>
<div class="project-icon"><i class="fas fa-robot"></i></div>
<h3 class="project-title">AI Chatbot Assistant</h3>
<p class="project-desc">基于 LLM 的对话机器人前端验证,采用 Streamlit 构建,通过 Docker 容器化部署。</p>
<div class="tech-stack">
<span class="tech-tag">Python</span>
<span class="tech-tag">Docker</span>
<span class="tech-tag">Streamlit</span>
</div>
<a href="/demos/chatbot/" class="project-link" target="_blank">进入应用 <i class="fas fa-arrow-right" style="margin-left:8px"></i></a>
</div>
<div class="project-card">
<div class="project-status status-dev">开发中</div>
<div class="project-icon"><i class="fas fa-chart-line"></i></div>
<h3 class="project-title">Data Viz Dashboard</h3>
<p class="project-desc">Vue3 + ECharts 构建的数据可视化大屏,用于展示服务器实时监控数据。</p>
<div class="tech-stack">
<span class="tech-tag">Vue3</span>
<span class="tech-tag">Nginx</span>
</div>
<a href="/demos/dashboard/" class="project-link" target="_blank">查看演示</a>
</div>
</div>
|
第三阶段:UI/UX 设计定制(Global Config)
为了达到“简约高效”的效果,我们需要配置 _config.butterfly.yml(在根目录新建此文件以覆盖默认主题配置)。
创建/修改 _config.butterfly.yml:
1
2
3
4
5
6
7
8
9
10
11
12
13
14
15
16
17
18
19
20
21
22
23
24
25
26
27
28
29
30
31
32
33
34
35
36
37
38
39
40
41
42
43
44
45
46
47
48
49
50
51
52
53
54
55
56
57
58
59
60
61
62
63
64
65
66
67
68
69
|
menu:
首页: / || fas fa-home
项目实验室: /projects/ || fas fa-flask
学习笔记: /archives/ || fas fa-book-open
subtitle:
enable: true
effect: true
source: false
sub:
- 既然选择了远方,便只顾风雨兼程
- 夜色难免黑凉、前行必有曙光
avatar:
img: /img/your_avatar.jpg
effect: true
aside:
card_author:
button:
enable: false
card_announcement:
enable: true
content: 本网站为个人技术验证与展示平台,主要用于记录本人在软件开发领域的学习心得,以及项目的实践、验证与展示。网站内容均为原创,非商业性用途,旨在进行经验与作品展示,便于同行交流,共同进步。
social:
fab fa-github: https://github.com/你的用户名 || Github
fas fa-envelope: mailto:你的邮箱 || Email
index_img: /img/home-bg.jpg
default_top_img: /img/default.jpg
background: url(/img/bg.jpg)
darkmode:
enable: true
button: true
autochange: true
font:
global-font-size: 16px
code-font-size: 14px
font-family: -apple-system, BlinkMacSystemFont, "Segoe UI", "Helvetica Neue", Lato, Roboto, "PingFang SC", "Microsoft YaHei", sans-serif
footer:
owner:
enable: true
since: 2024
custom_text: "Powered by <a href='https://hexo.io'>Hexo</a> | Deployed via <a href='https://www.docker.com'>Docker</a>"
highlight_theme: mac
|
这些页面默认是不存在的,需要你手动创建。
**步骤 1:**创建文件 在终端(Terminal)运行以下命令:
1
2
| hexo new page tags
hexo new page categories
|
**步骤 2:**配置 Front-matter 找到你刚刚生成的 source/tags/index.md 文件,修改内容为:
1
2
3
4
5
6
| ---
title: 标签
date: 2023-10-27 10:00:00
type: "tags" # 这一行最重要,告诉主题这是标签页
comments: false
---
|
同样的,修改 source/categories/index.md:
1
2
3
4
5
6
| ---
title: 分类
date: 2023-10-27 10:00:00
type: "categories" # 这一行最重要
comments: false
---
|
**步骤 3:**如果想同时在菜单中启用 最后确保在 _config.butterfly.yml 的 menu: 中取消了相关注释:
1
2
3
4
| menu:
首页: / || fas fa-home
标签: /tags/ || fas fa-tags
分类: /categories/ || fas fa-folder-open
|
为了帮助你更好地理解如何创建 Tags 和 Categories 页面,推荐观看以下视频:
[Tags & Categories | Hexo Tutorial][https://www.youtube.com/watch?v=UNTk5XkXKdQ]
这个视频详细演示了如何在 Hexo 中手动创建标签和分类页面。
四、部署 Hexo 静态页面
💡 核心思路:将本地 hexo generate 生成的 public 目录文件上传到服务器
1. 本地生成静态文件(在你自己的电脑操作)
1
2
| cd 你的hexo项目目录
hexo clean && hexo generate
|
2. 上传文件到服务器(任选一种方式,推荐方案 C)
先在服务器端创建文件夹。
1
| sudo mkdir /var/www/hexo
|
方式 A:SCP 上传(简单直接)
1
| scp -r public/* deploy@101.126.131.181:/tmp/hexo_site
|
方式 B:Git 上传(适合长期维护)
方案C:一键部署(推荐,以下为具体介绍)
hexo d 是 hexo deploy 命令的简写形式,用于将生成的静态网站文件自动部署到配置的目标位置。
核心功能
- 作用:将
hexo generate 生成的 public 目录中的文件自动上传/同步到远程服务器或托管平台
- 前提:必须先执行
hexo generate(或直接使用 hexo g -d 一键生成+部署)
- 依赖配置:需要在 Hexo 项目的
_config.yml 文件中预先配置部署参数
常见部署类型配置示例
1. Git 部署(GitHub Pages/Gitee Pages)
1
2
3
4
5
| deploy:
type: git
repo: git@github.com:username/username.github.io.git
branch: main
message: "Site updated: {{ now }}"
|
2. rsync 部署(到云服务器,适合你的场景)
1
2
3
4
5
6
7
8
9
| deploy:
type: rsync
host: 你的服务器IP
user: deploy
root: /var/www/hexo
port: 22
delete: true
verbose: true
ignore_errors: false
|
3. FTP 部署
1
2
3
4
5
6
| deploy:
type: ftpsync
host: your.server.com
user: username
pass: password
remote_dir: /path/to/www
|
你的场景中的实用建议
既然你已经在云服务器上配置了 Nginx,推荐使用 rsync 部署方式替代手动上传:
-
安装部署插件(在本地 Hexo 项目目录):
1
| npm install hexo-deployer-rsync -s
|
-
配置 _config.yml:
1
2
3
4
5
6
7
8
| deploy:
type: rsync
host: 101.126.131.181
user: deploy
root: /var/www/hexo
port: 22
delete: true
verbose: true
|
-
一键部署:
1
2
3
4
5
| hexo clean && hexo g -d
|
方式的对比
| 方式 |
传统方式 |
hexo d (rsync) |
| 操作步骤 |
1. 本地生成
2. 手动SCP上传
3. SSH登录设置权限 |
一条命令完成全部操作 |
| 速度 |
较慢(需人工干预) |
极快(自动化) |
| 一致性 |
可能漏传文件 |
保证完整同步 |
| 适用场景 |
一次性部署 |
频繁更新博客 |
⚠️ 重要提示
💡 建议:在你的场景中,配置 rsync 部署是最优解。只需首次设置,后续写完文章后执行 hexo g -d 即可秒级更新线上博客,无需手动操作服务器。
五、配置 Nginx 服务
1
| sudo nano /etc/nginx/sites-available/hexo.conf
|
粘贴以下配置(替换 server_name 项 为你的域名或服务器 IP):
1
2
3
4
5
6
7
8
9
10
11
12
| server {
listen 80;
listen [::]:80;
server_name 101.126.131.181;
root /var/www/hexo;
index index.html;
location / {
try_files $uri $uri/ =404;
}
}
|
nano 操作命令:
Ctrl + O:保存(会询问文件名,直接回车确认)。Ctrl + X:退出,若文件修改过会提示是否保存。
启用配置:
1
2
| sudo ln -s /etc/nginx/sites-available/hexo.conf /etc/nginx/sites-enabled/
sudo nginx -t && sudo systemctl reload nginx
|
设置权限
1
2
3
4
|
sudo mkdir /var/www/hexo
sudo chown -R www-data:www-data /var/www/hexo
sudo chown -R deploy:deploy /var/www/hexo
|
绑定域名
1
2
3
|
sudo apt install certbot python3-certbot-nginx -y
sudo certbot --nginx -d wquan0717.top
|
绑定域名后的hexo.conf可能出现错误,可以手动调整一下。
1
2
3
4
5
6
7
8
9
10
11
12
13
14
15
16
17
18
19
20
21
22
23
24
25
26
|
server {
listen 80;
listen [::]:80;
server_name wquan0717.top www.wquan0717.top;
return 301 https://$host$request_uri;
}
server {
listen 443 ssl;
listen [::]:443 ssl;
server_name wquan0717.top www.wquan0717.top;
ssl_certificate /etc/letsencrypt/live/wquan0717.top/fullchain.pem;
ssl_certificate_key /etc/letsencrypt/live/wquan0717.top/privkey.pem;
include /etc/letsencrypt/options-ssl-nginx.conf;
ssl_dhparam /etc/letsencrypt/ssl-dhparams.pem;
root /var/www/hexo;
index index.html;
location / {
try_files $uri $uri/ =404;
}
}
|
六、验证部署
- 在浏览器访问
http://101.126.131.181,或你的域名(如 https://wquan0717.top)
- 能看到 Hexo 页面即表示部署成功!
七、本地 WSL2 安装 Docker
在准备离线镜像和进行项目实战之前,需要先在你的 WSL2 环境中安装 Docker。
1. 更新 WSL2 系统包
1
| sudo apt update && sudo apt upgrade -y
|
2. 安装 Docker 依赖
1
| sudo apt install -y ca-certificates curl gnupg lsb-release
|
3. 添加 Docker 官方 GPG 密钥
1
2
| sudo mkdir -m 0755 -p /etc/apt/keyrings
curl -fsSL https://download.docker.com/linux/ubuntu/gpg | sudo gpg --dearmor -o /etc/apt/keyrings/docker.gpg
|
4. 设置 Docker 软件源
1
2
3
| echo \
"deb [arch=$(dpkg --print-architecture) signed-by=/etc/apt/keyrings/docker.gpg] https://download.docker.com/linux/ubuntu \
$(lsb_release -cs) stable" | sudo tee /etc/apt/sources.list.d/docker.list > /dev/null
|
5. 安装 Docker Engine
1
2
| sudo apt update
sudo apt install -y docker-ce docker-ce-cli containerd.io docker-buildx-plugin docker-compose-plugin
|
6. 启动 Docker 并设置开机自启
1
2
| sudo systemctl enable --now docker
sudo systemctl start docker
|
7. 验证安装
8. 将当前用户加入 docker 组(避免每次用 sudo)
1
2
| sudo usermod -aG docker $USER
newgrp docker
|
八、服务器 Docker 离线安装
由于该服务器可能无法直接访问外网下载Docker安装包,我们采用离线安装 Docker 的方案:先在本地下载安装包,再上传到服务器进行安装。
第一步:确认服务器系统架构
常见结果:
x86_64 → 选择 AMD64 包aarch64 → 选择 ARM64 包(如果是 ARM 服务器)
第二步:本地下载 Docker 安装包(在你的电脑操作)
选项 A:直接下载官方 DEB 包(推荐)
访问官方下载页面:
👉 [https://download.docker.com/linux/ubuntu/dists/jammy/pool/stable/][]
根据你的架构下载以下 5 个文件(示例为 AMD64):
1
2
3
4
5
6
7
8
9
10
|
containerd.io_1.6.32-1_amd64.deb
docker-ce_25.0.3-1~ubuntu.22.04~jammy_amd64.deb
docker-ce-cli_25.0.3-1~ubuntu.22.04~jammy_amd64.deb
docker-buildx-plugin_0.12.1-1~ubuntu.22.04~jammy_amd64.deb
docker-compose-plugin_2.24.5-1~ubuntu.22.04~jammy_amd64.deb
|
选项 B:使用 Docker 官方脚本生成离线包(高级)
1
2
3
4
|
wget https://get.docker.com -O get-docker.sh
bash get-docker.sh --dry-run > docker-packages.txt
apt download $(cat docker-packages.txt)
|
第三步:创建安装包集合并上传
1
2
3
4
5
6
|
mkdir docker-offline
scp -r ./docker-offline deploy@101.126.131.181:/tmp/
|
第四步:在服务器上离线安装
1
2
3
4
5
6
7
8
9
10
11
12
13
14
15
16
17
18
19
20
21
22
23
|
cd /tmp/docker-offline
sudo dpkg -i containerd.io_*.deb
sudo dpkg -i docker-ce-cli_*.deb
sudo dpkg -i docker-ce_*.deb
sudo dpkg -i docker-buildx-plugin_*.deb
sudo dpkg -i docker-compose-plugin_*.deb
sudo apt --fix-broken install -y
sudo systemctl enable --now docker
sudo systemctl start docker
sudo docker --version
sudo apt install -y htop net-tools
|
第五步:永久授权用户(避免 sudo)
1
2
3
4
5
|
sudo usermod -aG docker $USER
newgrp docker
|
第六步:离线镜像准备
1
2
3
4
5
6
7
8
9
10
|
docker pull nginx:alpine
docker pull nginxproxy/nginx-proxy:alpine
docker save -o nginx-images.tar nginx:alpine nginxproxy/nginx-proxy:alpine
scp nginx-images.tar deploy@101.126.131.181:/tmp/
docker load -i /tmp/nginx-images.tar
|
九、Docker 项目实战
Docker 环境已经安装完成后,我们可以开始构建并部署一个演示项目。这个实战将展示如何将项目打包成 Docker 镜像,然后上传到服务器运行。
1. 规划项目目录结构
为了保持服务器整洁,不要把文件乱放。建议在用户主目录下建立一个 apps 或 projects 目录。
1
2
3
4
5
6
7
8
|
mkdir -p ~/projects
mkdir -p ~/projects/demo-chatbot
cd ~/projects/demo-chatbot
|
2. 编写项目代码
我们模拟一个简单的动态网站(比如一个 Python Flask 接口),这将验证你的 Nginx 转发是否成功。
你需要创建以下 3 个文件。你可以使用 vim 或 nano 创建它们。
1
| cd ~/projects/demo-chatbot
|
(1) app.py (业务代码)
这是一个极简的 Web 服务,它会返回当前的服务器时间和一条欢迎信息。
复制粘贴以下内容,按 Ctrl+s 保存,按 Ctrl+x 退出编辑。
1
2
3
4
5
6
7
8
9
10
11
12
13
14
15
16
17
18
19
20
21
22
23
24
25
26
|
from flask import Flask
import datetime
import socket
app = Flask(__name__)
@app.route('/')
def hello():
hostname = socket.gethostname()
time_str = datetime.datetime.now().strftime("%Y-%m-%d %H:%M:%S")
html = f"""
<div style="font-family: sans-serif; text-align: center; padding: 50px;">
<h1 style="color: #333;">🚀 Docker 部署成功</h1>
<p>这是一个运行在 Docker 容器内的 Python 应用。</p>
<p><strong>容器 ID:</strong> {hostname}</p>
<p><strong>当前时间:</strong> {time_str}</p>
</div>
"""
return html
if __name__ == '__main__':
app.run(host='0.0.0.0', port=5000)
|
(2) requirements.txt (依赖清单)
告诉 Docker 需要安装什么 Python 包。
1
| sudo nano requirements.txt
|
复制粘贴以下内容,按 Ctrl+s 保存,按 Ctrl+x 退出编辑。
1
2
| # 文件名: requirements.txt
Flask==3.0.0
|
(3) Dockerfile (构建说明书)
这是告诉 Docker 如何把上面的代码打包成一个镜像。
复制粘贴以下内容,按 Ctrl+s 保存,按 Ctrl+x 退出编辑。
1
2
3
4
5
6
7
8
9
10
11
12
13
14
15
16
17
18
19
20
|
FROM python:3.9-slim
WORKDIR /app
COPY requirements.txt .
RUN pip install --no-cache-dir -r requirements.txt
COPY app.py .
EXPOSE 5000
CMD ["python", "app.py"]
|
3. 使用 Docker Compose 管理 (核心步骤)
不要直接使用 docker run 命令,那是新手的做法。使用 docker-compose.yml 可以让你把配置写在文件里,方便以后维护。
进入 ~/projects/demo-chatbot/ 目录:
1
| cd ~/projects/demo-chatbot
|
在 ~/projects/demo-chatbot/ 目录下创建 docker-compose.yml:
1
| sudo nano docker-compose.yml
|
复制粘贴以下内容,按 Ctrl+s 保存,按 Ctrl+x 退出编辑。
1
2
3
4
5
6
7
8
9
10
11
12
13
14
15
16
17
18
19
20
21
22
|
version: '3.8'
services:
chatbot:
build: .
container_name: my-chatbot-container
restart: always
ports:
- "127.0.0.1:8081:5000"
deploy:
resources:
limits:
cpus: '0.5'
memory: 256M
|
4. 启动项目
现在一切准备就绪,开始运行。
1
2
3
4
5
6
|
cd ~/projects/demo-chatbot
docker compose up -d --build
|
验证是否成功:
运行 docker ps,你应该能看到类似这样的输出:
1
2
| CONTAINER ID IMAGE STATUS PORTS NAMES
a1b2c3d4e5f6 demo-chatbot-chatbot Up 10 seconds 127.0.0.1:8081->5000/tcp my-chatbot-container
|
此时,你的应用已经在本机内部的 127.0.0.1:8081 上跑起来了!
5. 镜像导出/导入法(推荐)
如果你需要在本地构建好镜像再上传到服务器,可以使用以下方法:
(1) 在本地电脑导出 Chatbot 镜像
1
2
3
4
5
6
7
8
9
10
11
12
13
14
15
16
|
docker ps -a
docker stop my-chatbot-container
docker commit 9270c19578e1 demo-chatbot:latest
docker save -o demo-chatbot.tar demo-chatbot:latest
ls -lh demo-chatbot.tar
|
(2) 上传到服务器
1
2
|
scp demo-chatbot.tar deploy@101.126.131.181:/tmp/
|
(3) 在服务器导入并运行
1
2
3
4
5
6
7
8
9
10
11
12
13
14
15
16
17
18
19
20
21
22
23
24
25
26
27
28
29
30
31
32
33
|
docker load -i /tmp/demo-chatbot.tar
docker images
mkdir -p ~/projects/chatbot
cd ~/projects/chatbot
cat > docker-compose.yml <<EOF
version: '3.8'
services:
chatbot:
image: demo-chatbot:latest
container_name: my-chatbot-container
expose:
- "5000" # 仅容器内部暴露,通过代理访问
restart: always
ports:
- "127.0.0.1:8081:5000"
# 资源限制(推荐)
deploy:
resources:
limits:
cpus: '0.5'
memory: 256M
EOF
docker compose up -d
|
6. 配置 Nginx 连接 Docker
现在我们需要修改 Nginx,让它把用户对 /demos/chatbot/ 的访问,转发给 Docker 的 8081 端口。
1. 编辑 Nginx 配置文件
(假设你的配置文件在 /etc/nginx/sites-available/hexo.conf)
进入编辑器:
1
| sudo nano /etc/nginx/sites-available/hexo.conf
|
执行以下修改:
1
2
3
4
5
6
7
8
9
10
11
12
13
14
15
16
17
18
19
20
21
22
23
24
25
| server {
listen 80;
server_name yourdomain.com;
location / {
root /var/www/hexo;
index index.html;
try_files $uri $uri/ =404;
}
location /demos/chatbot/ {
proxy_pass http://127.0.0.1:8081/;
proxy_set_header Host $host;
proxy_set_header X-Real-IP $remote_addr;
proxy_set_header X-Forwarded-For $proxy_add_x_forwarded_for;
proxy_redirect off;
}
}
|
2. 测试并重启 Nginx
1
2
3
4
5
|
sudo nginx -t
sudo systemctl reload nginx
|
十、工作流演示
1. 发布学习笔记
- 执行
hexo new post "Docker学习心得" 创建新文章
- 编写 Markdown 内容
hexo clean && hexo g -d 生成静态文件并部署到服务器的 /var/www/hexo 目录- 访客可以通过首页的“学习笔记”查看
2. 发布新项目(例如 Go 语言 API 服务)
- Docker 端:编写 Dockerfile,启动容器并映射到
8083 端口
- Nginx 端:添加
location /demos/go-api/ { proxy_pass http://127.0.0.1:8083/; } 配置并重载 Nginx
- Hexo 端:编辑
source/projects/index.md,复制一个 <div class="project-card"> 块,修改标题、描述,并将链接指向 /demos/go-api/
- 部署:
hexo clean && hexo g -d 重新生成 Hexo 静态文件并部署到服务器的 /var/www/hexo 目录
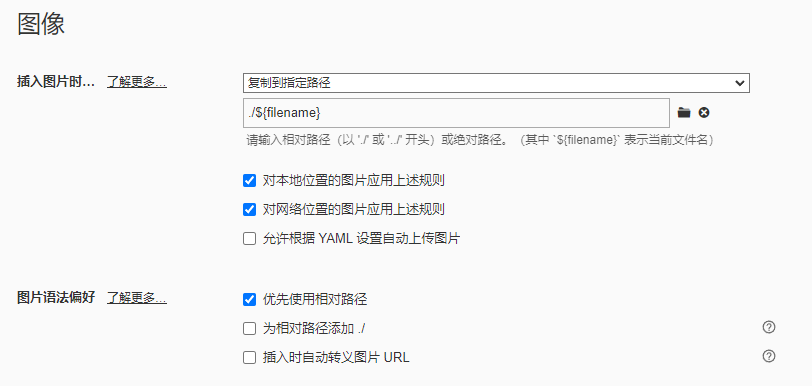
3. Typora 图片资源设置(可选)
如果你使用 Typora 编辑器并需要在 Markdown 中添加图片等资源,可以按以下步骤设置:
- 打开 Typora 的偏好设置
- 点击“图像”选项
- 按照下图方式进行设置:
十、总结
这套方案通过修改 Hexo 的 page 布局,利用 HTML/CSS 手写了一个高度定制化的“应用商店”风格的项目入口页,避免了维护两个独立前端系统的麻烦。同时,利用 Nginx 的 location 块级路由,完美地将静态博客与后端 Docker 容器串联起来。
十二、下一步建议
为了让网站看起来更像“X”或“Apple”的设计风格,建议为每个项目准备一个 SVG 图标,使整体视觉效果更加精致。